Electronic Team uses cookies to personalize your experience on our website. By continuing to use this site, you agree to our cookie policy. Click here to learn more.
We all know how important it is to backup our phones regularly, but what about your Mac? Do you regularly perform cloud sync between your Mac and cloud drives like iCloud or Dropbox? Ensuring you do this frequently makes sure you always have the relevant, most up-to-date information across all your devices, and a safe, secure backup of your data in the cloud. You can store your photos, videos, contacts, calendar appointments, and other important files in the cloud, as well as having them on your Mac and across all your devices. This means if your devices are lost or stolen or your Mac is damaged, you’ll always be able to access your data.
There are times when you might need to perform an iCloud sync Mac. For example, perhaps you’re back from vacation and want to backup all your photos to your iCloud, or maybe you’re heading off on a business trip and need to backup your contacts and calendar appointments to iCloud, so you can view them on your iPhone while you’re traveling. There are a number of ways to do this, and we’ll guide you through some of the best options for syncing your photos, calendar, and more, step by step.

In this guide, we’ll reveal some best practices to sync iCloud photos to Mac. You might need to do this if you want to edit photos you recently took, using software on your Mac, or if you simply want to ensure you have your photos on your Mac at home, as well as in iCloud.
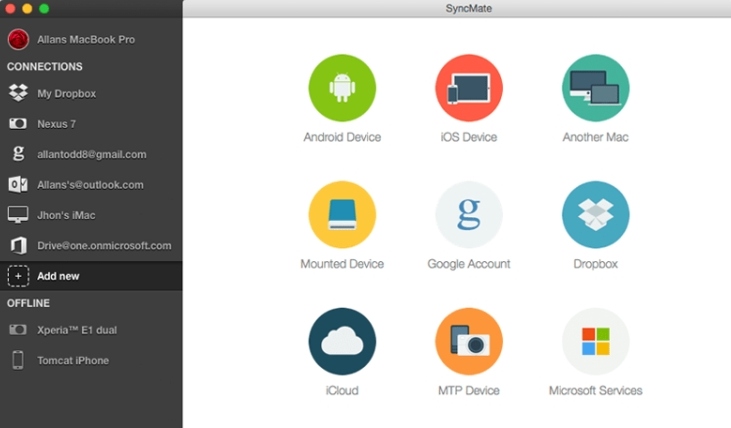
• Sync photos from iCloud to Mac with SyncMate
One of the quickest and easiest ways to sync cloud storage with your Mac is to use a file sync software like SyncMate. You can download the software for free, although you’ll need to upgrade to Expert edition to sync photos.
Here’s how to sync iCloud photos to Mac with SyncMate:
You only need to set this up once, and SyncMate will automatically sync your photos from iCloud to Mac in the future.
• Use iCloud to sync photos with Mac
If you don’t want to download sync software to sync iCloud photos with Mac, you can use iCloud Photo Library for your iCloud sync.
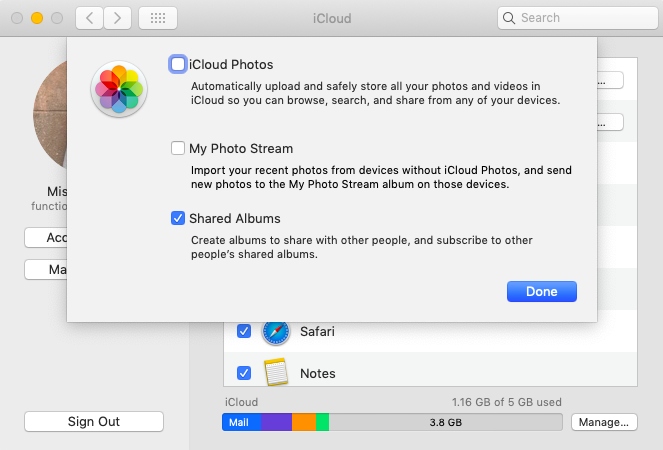
Here’s how to do it:
It’s quick and easy to do.
What if you need to sync your calendar appointments rather than your photos? Perhaps you need to ensure your Mac is updated with your appointments, or maybe you want to sync your Outlook calendar with iCloud to ensure you can access your appointments while you’re out and about. In this guide, we’ll reveal some best practices for syncing iCloud Calendar with Outlook for Mac.
• Sync Calendar from Outlook to iCloud with the pro app
For a fast, reliable way to sync Outlook to iCloud, SyncMate is a powerful, professional tool that makes syncing all your appointments easy. Just follow the below steps:
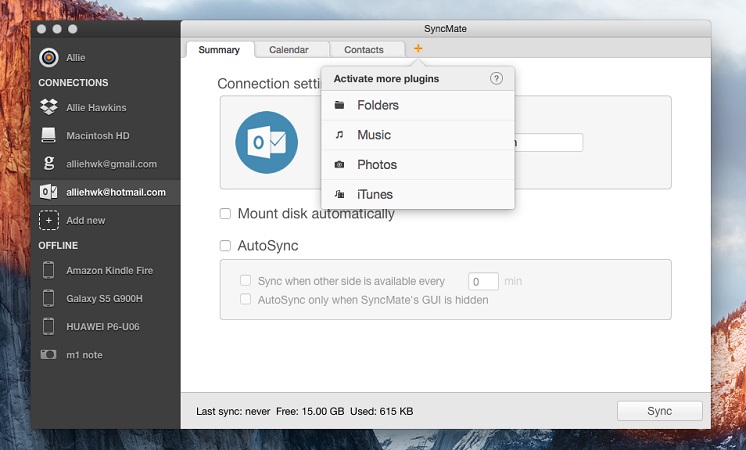
Note: Only one-time events are synced; recurring events are not supported.
• How to sync Outlook Calendar and iCloud (Microsoft Office Tips)
If you don’t want to download sync software, you can manually sync iCloud calendar with Outlook for Mac. Here’s how:
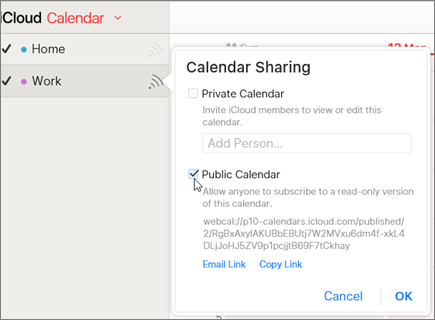
You should see your iCloud Calendar listed under “Other Calendars” in Outlook on the web and in your Outlook for Mac Calendar.
What about if you want to sync your Mac contacts with iCloud? You might want to do this if you’ve recently started a new job or attended an event where you added a lot of new contacts to your phone, for example. Below, we’ll reveal two of the best ways to sync contacts between Mac and iCloud.
• Try SyncMate to sync contacts between Mac and iCloud
When it comes to how to sync iCloud on Mac, you can easily sync your contacts using SyncMate, for free!
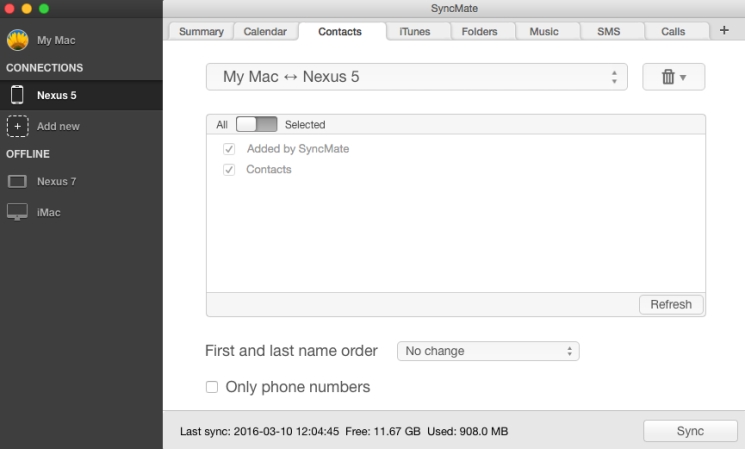
Here’s how to do it:
You can select all contacts or just specific ones, and once you’ve set up the sync process, SyncMate will automatically sync your contacts in the background in the future.
• How to sync contacts from Mac to iCloud (Apple team tips)
You can sync contacts from Mac to iCloud manually if you don’t want to download and install sync software. Follow the below steps:
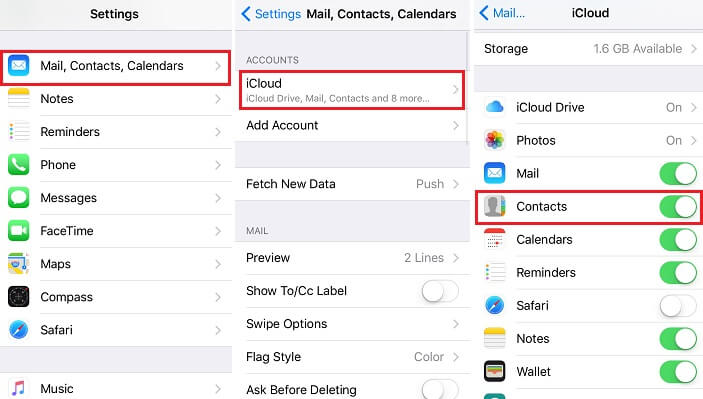
If you want to perform a one-time sync, and you’re running macOS Monterey, you can do this using Finder.
If you prefer Dropbox to iCloud, you might find you need to sync your Dropbox data to your Mac, and you might be wondering how to sync Dropbox to Mac. Perhaps your college essay is stored in your Dropbox and you need to work on it, or maybe you have photos stored in your Dropbox that you want to attach to an email or share on social media. You might even want to sync meeting notes from your last meeting with your Mac so you can access them before today’s meeting.
One of the most common things you might need to sync with Dropbox is your photos. You might want to backup your photos from your Mac to Dropbox in case of a hard drive failure or data loss, or sync Dropbox on Mac to edit your photos at home. In this guide, we’ll reveal some best practices to sync Mac photos with Dropbox.
Here are two of the best ways to sync Mac photos to Dropbox.
• How to sync Mac photos to Dropbox using SyncMate
SyncMate is a professional tool that makes syncing all your photos from Mac to Dropbox easy and convenient. Here are the steps to follow to sync Mac photos to Dropbox:
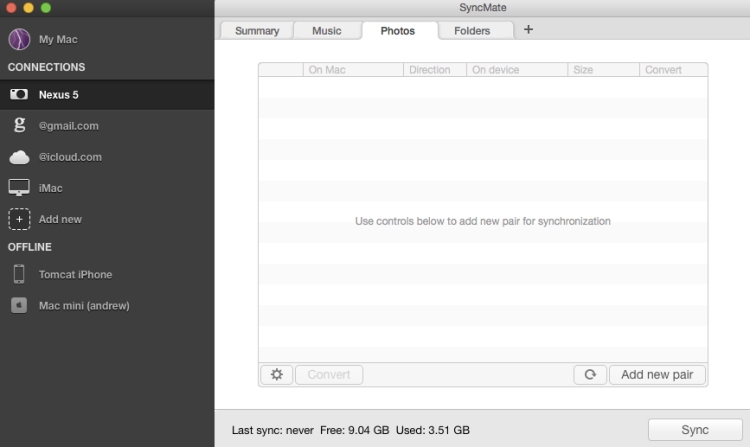
Your photos should now sync to Dropbox from your Mac. When syncing from your Mac to Dropbox, you can adjust the conversion settings to convert your videos and pictures into another format.
• Transfer Mac photos to Dropbox with Dropbox Website
Dropbox allows you to manually transfer photos to your Dropbox storage, without using any sync software. It’s a little more time-consuming, but here is the step-by-step guide.
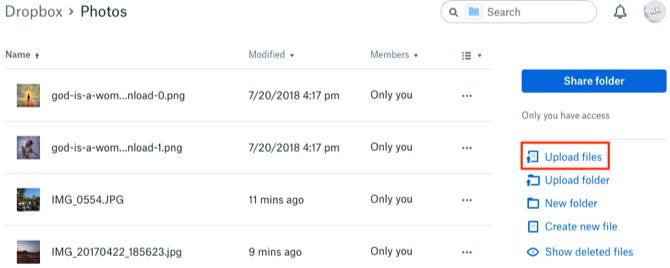
Note: You can also drag and drop files onto the Dropbox interface to transfer them to your Dropbox account.
What if you have a folder of college work on your Mac that you need to backup in case of data loss or hardware failure, and you want to sync it to Dropbox? In this guide, we’ll reveal some of the best practices to sync folders from Mac to Dropbox.
The best way to sync folders between Mac and Dropbox is to use SyncMate. This is a professional, powerful tool that minimizes the risk of data loss, and it’s easy to use.
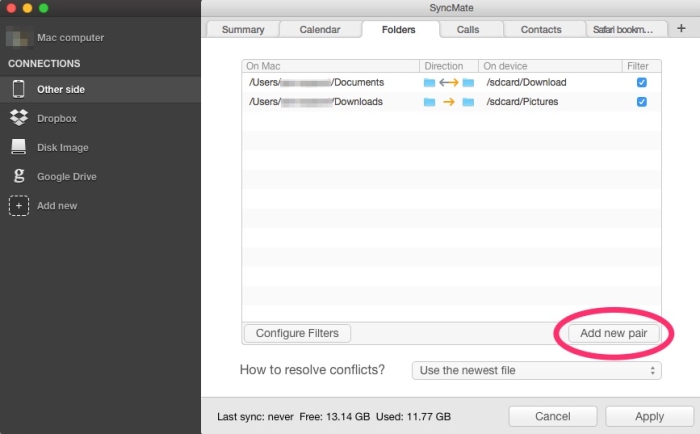
Here are the steps to follow to sync folder on your Mac to your Dropbox account:
You might not want to sync whole folders between Mac and Dropbox, but still need to sync files. Perhaps you have college work stored on your Mac that you’d like to backup to Dropbox, to ensure it’s safe. In this guide, we’ll reveal some best practices to sync files between Mac and Dropbox.
Dropbox Smart Sync lets you sync files from Mac to Dropbox, and vice versa, freeing up space on your Mac.
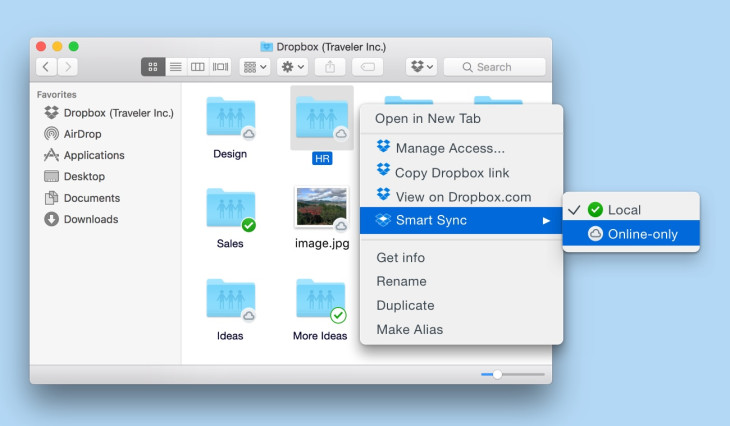
Here’s how to use Smart Sync:
You can also use the Desktop Dropbox app to sync files using Smart Sync. To download files from Dropbox to your Mac, just double click the file in question.

As well as Dropbox and iCloud, Google Drive is a popular online cloud storage service. You may want to sync Google Drive with Mac if, for example, you want to backup important contacts from your Mac safely, in case of accidental deletion or data corruption. Or you might want to sync data from Google Drive to Mac if your Mac hard drive has failed and you’ve lost your photos, contacts, calendar appointments, or other files or folders stored on your Mac.

If you need to backup precious family vacation snapshots to your Google Drive from your Mac, you’re probably wondering how to sync Google Drive accounts with Mac. We’ll reveal some best practices for syncing your Mac with your Google Drive account in this guide.
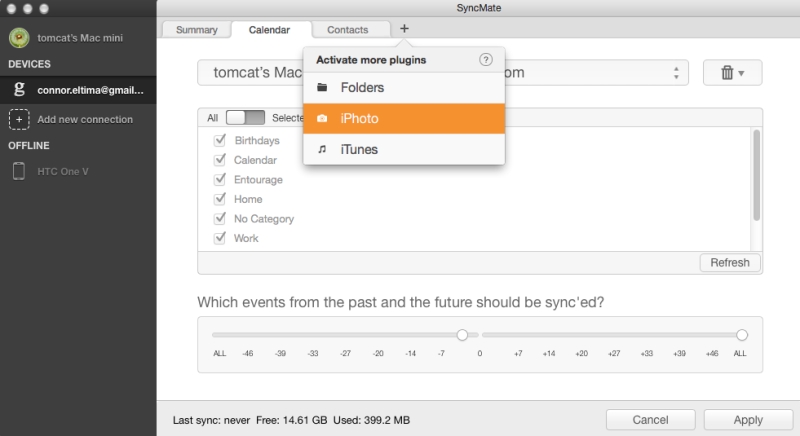
Here are two of the best ways to sync Google Drive accounts with Mac:
• Sync Google Drive account to Mac using SyncMate
SyncMate is a one-stop sync Google Drive account solution for Mac. It’s professional software that makes the syncing process quick and easy. Follow the below steps to sync your Google Drive account to Mac with SyncMate:
You can now sync contacts, calendars, photos, videos, files, and folders between your Google Drive account and Mac.
• How to sync Google accounts with Mac manually
If you’d prefer, you can sync your Google Drive account with Mac manually, although it’s a little more complicated. Follow the below steps to manually sync your Google Drive with Mac:
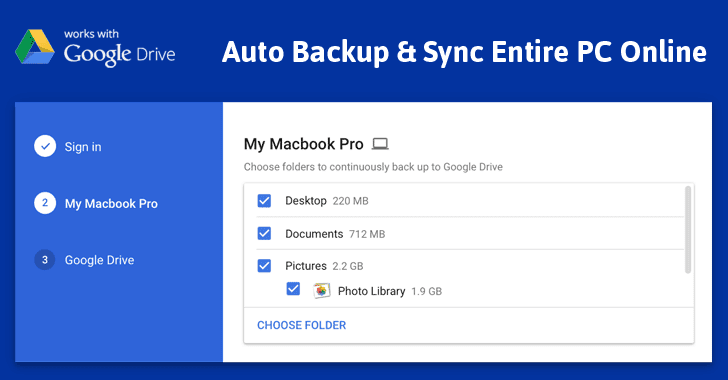
That’s it - from now on, Google Drive will automatically sync with your Mac according to your settings.
What if you want to sync a specific Google Drive folder, or folders, to Mac, or vice versa? You might need to do this if, for example, you have important paperwork for a meeting stored on your Mac that you need to access from Google Drive on the go.
You can easily sync folders between Google Drive and Mac by following the below steps:
You only need to do this once and Google Drive will automatically sync with your Mac in the future.
Maybe you don’t want to sync files or folders from Google Drive to Mac, but need to securely backup precious photos following a family birthday party or event, in case of data loss or hard drive failure? Try SyncMate to sync Google Drive photos with Mac.
SyncMate is professional sync software that makes it easy to sync Google Drive photos with Mac, quickly and with minimal risk of data loss.
Here’s how to use SyncMate to sync your photos from Google Drive with Mac:
It’s that easy, and your sync should only take a few minutes, depending on how many photos you’re syncing.
If you’re using Box Drive rather than Dropbox or Google Drive, you might need to perform Box sync for Mac when your hard drive is getting full, to free up space. Or perhaps you don’t want to delete files from your Mac but simply create a backup in the Cloud, so you can easily access meeting papers, important files, and other documents from any device. Or you may need to sync Box Drive with Mac when you have backed up photos or videos that are no longer on your Mac, and you need to download them to share or edit.
When you need to sync Box Drive folders with your Mac - for example, when you’ve stored meeting papers in a folder on Box Drive and need to sync it to your Mac for your morning meeting - it’s quick and easy to do. In this guide, we’ll reveal the best practice for syncing Box Drive with Mac.
The quickest way to keep folders in sync between Box and Mac is to use Box Sync, which lets you mirror folders stored on Box Drive to your Mac desktop. Follow the below steps to sync Box folders to Mac:
Your synced files are stored in a new folder called “Box Sync” which is located in the “Favorites” section in the left pane of Finder on your Mac.
What if you’re using both Box Drive and Google Drive to backup your most important files, and you need to ensure data is up-to-date across both cloud drives? This might be the case if you’re keeping two separate backups of your most precious family photos, to avoid losing them. In this guide, we’ll reveal how to use cloudHQ to sync Google Drive and Box.
You can easily sync Google Drive and Box with Mac by using cloudHQ. Here are the steps to follow:
You’ll receive an email when the sync completes successfully.
OneDrive is a popular cloud drive that’s easy to sync with your Mac and other devices. But why might you need to do this? Ensuring contacts and calendar appointments are up-to-date and backed up across all your devices (like your Mac, tablet, and smartphone) is one of the main reasons, but you might also want to sync files or folders between your Mac and OneDrive if you’re working on an important project for work or school and need to protect against accidental deletion or hard drive failure.
Do you store all your important files on your Mac or OneDrive? If your photos are stored on your Mac, an OneDrive sync Mac means you’re protected against losing them due to hard drive failure - or accidental deletion. In this guide, we’ll reveal the best practice to sync OneDrive with Mac using an Onedrive account.
When you install the OneDrive app on Mac, the OneDrive folder is created and files in it are kept in sync with OneDrive automatically.
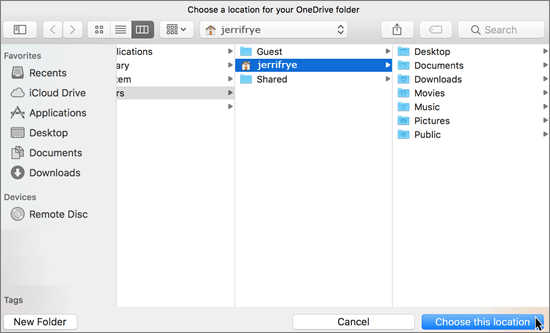
Here’s how to sync OneDrive with Mac using your OneDrive account:
Syncing OneDrive folders to Mac might be necessary if you need to keep your files organized and sync multiple files at one time - for example, all files relating to a specific work project. In this guide, we’ll reveal the best practices to sync folders from OneDrive to Mac manually.
If you don’t want to sync all your folders from OneDrive to Mac, follow these steps to sync only selected folders:
Unchecking a folder means it will be deleted from your Mac, but don’t worry - it will still be available in OneDrive in the cloud.
Syncing data from cloud drives to Mac (and vice versa) doesn’t have to be complicated. Using sync software like SyncMate can make the whole process quick and easy, and you’ll always ensure you have the most up-to-date data backed up across all your devices, in case they’re lost, stolen, or damaged.